contents | news | |||||||||
| New Desiccant Strip polyethelene material 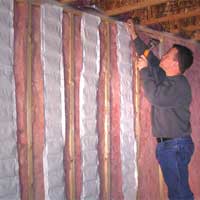 The Desiccant Strip is a 6.5 foot length of spun polyethelene material formed into pouches containing engineered silica gel. The Desiccant Strip makes use of non-indicating silica gel for excess moisture disposal and a small quantity of indicating silica gel to allow for inspection of the saturation stage of the product. The Desiccant Strip is a dehumidifying product that disposes of large quantities of moisture from a defined space. Moisture within building cavities is a serious problem in the new construction and remodel sectors of the construction industry. Moisture problems within building cavities are commonly indicated and accompanied by the presence of Termites, Carpenter Ants, Cockroaches, Silverfish, Mold, and numerous other agents of wood decay. The Desiccant Strip is a 6.5 foot length of spun polyethelene material formed into pouches containing engineered silica gel. The Desiccant Strip makes use of non-indicating silica gel for excess moisture disposal and a small quantity of indicating silica gel to allow for inspection of the saturation stage of the product. The Desiccant Strip is a dehumidifying product that disposes of large quantities of moisture from a defined space. Moisture within building cavities is a serious problem in the new construction and remodel sectors of the construction industry. Moisture problems within building cavities are commonly indicated and accompanied by the presence of Termites, Carpenter Ants, Cockroaches, Silverfish, Mold, and numerous other agents of wood decay.Elimination of excessive moisture is the only certain way to prevent or arrest the accelerated decomposition of a building brought about by all of these agents. Moisture within building cavities can come from leaks in exterior building finishes, or leaky plumbing might be the cause. Other possible sources of moisture intrusion include storm damage, and flooding. One often overlooked source of moisture that occurs within all building cavities is BUILT IN MOISTURE. Regardless of the source of the moisture, the fact remains that immediate repair of the moisture introduction source and immediate removal of the moisture is the key to limiting damage. The most common method of removing moisture has historically been through the use of fans and other air moving dehumidifiers. Drying a wet building may take days or weeks using this method, and results will vary based upon starting moisture content, ambient temperature and humidity, the capacity of the dehumidifier, and many other factors. Another drawback to the use of air circulation to dry a building is that it allows airborne contaminants and odors to spread and multiply freely during the drying process. Because the silica gel contained in the Desiccant Strip is capable of disposing of large quantities of moisture, it offers the consumer the opportunity to dry a building cavity such as a wall cavity from the inside out without the use of air circulation. The Desiccant Strip is not capable of overdrying wall cavities and causing harmful effects due to a natural balance called equilibrium capacity, this is the point at which the air in the wall cavity has as much hold on the remaining moisture as the desiccant has draw. In addition to all of these benefits, independent testing has conclusively proven that the Desiccant Strip product impacts the R-Value of wall cavities in a positive way. The Desiccant Strip increases R-Value when installed in a common wall assembly with fiberglass insulation. Removal of excess moisture within the lumber increases the R-Value of the wall cavity as well. The Desiccant Strip is sized for simplicity, the same strip size is used for cavities comprised of 2x4 or 2x6 lumber and although lumber that starts dryer will typically be reduced to a lower Equilibrium Moisture Content (EMC) it makes no difference whether the lumber is kiln dried or green. In wall cavities that are taller or shorter than the standard 8 feet, simply subtract or add Desiccant Strip equal to the size of the cavity. This product does not require a license to install, and there is no need to evacuate the building while it is being installed. In fact, you will find no moisture control / mold inhibiting product on the market that is easier to install. The product is commonly installed by the insulation contractor just prior to applying the vapor retarder. In regions where a vapor retarder on the interior side of the structure is not used, the product should be installed just prior to the drywall or other interior finish. The added labor is a matter of minutes per wall and the person installing the product needs no additional tools than are commonly used in the insulation process. Simply hang the Strip on the top plate with stapler, hammer and roofing nail, or a similar tool. write your comments about the article :: © 2005 Construction News :: home page |